
Guide to Spring MVC in JAVA
- Chirag Ahir
- Mar 28, 2023
- 5 min read
Spring is a popular Java framework that is used to build web applications. It provides a variety of tools and libraries that make it easier to develop, test, and deploy applications. One of the most popular parts of the Spring framework is Spring MVC, which is a model-view-controller (MVC) framework used for building web applications.
In this blog post, I will provide an overview of Spring MVC and explain how it works, the components involved, and how to build a simple web application using Spring MVC.
What is Spring MVC ?
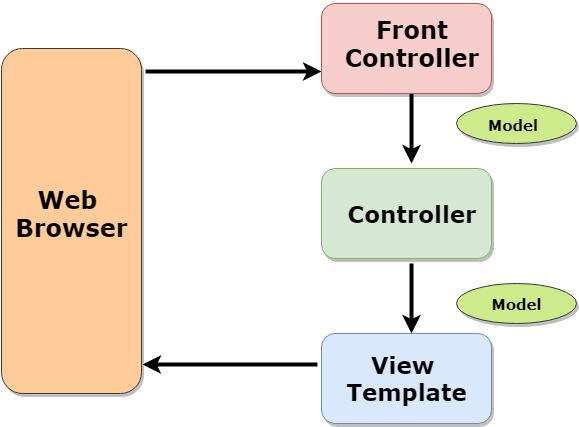
Spring MVC is a web framework that is built on top of the Spring framework. It follows the Model-View-Controller (MVC) pattern, which is a design pattern used to separate an application's concerns into three distinct components: the model, the view, and the controller.
The model represents the data and business logic of the application. The view represents the user interface and is responsible for rendering the data to the user. The controller is the intermediary between the model and the view and is responsible for processing user requests, updating the model, and selecting the appropriate view to render.
The Spring model-view-controller (MVC) framework is designed around a DispatcherServlet that dispatches requests to handlers, with configurable handler mappings, view resolution, locale and theme resolution as well as support for uploading files. The default handler is based on the @Controller and @RequestMapping annotations, offering a wide range of flexible handling methods. With the introduction of Spring 3.0, the @Controller mechanism also allows you to create RESTful Web sites and applications, through the @PathVariable annotation and other features.
How each components works in Spring MVC
There are several key components involved in building a Spring MVC web application:
DispatcherServlet: This is the front controller for all requests to the application. It receives requests and routes them to the appropriate controller.
HandlerMapping: This maps requests to specific controllers based on the request URL.
Controller: This is the main controller interface in Spring MVC. It defines methods for handling requests and returning views.
Model: This represents the data and business logic of the application.
View: This is responsible for rendering the data to the user.
ViewResolver: This resolves view names to actual views.
Advantages of Spring MVC framework
Spring MVC is a popular web framework for Java that provides several advantages over other web frameworks. Here are some of the advantages of using Spring MVC:
1. Flexible configuration: Spring MVC allows for flexible configuration of the framework. Developers can configure Spring MVC using XML, annotations, or Java-based configuration, making it easy to customize the framework to meet specific project requirements.
2. Easy to test: Spring MVC is designed to be testable. Controllers can be easily tested using JUnit or other testing frameworks, making it easy to ensure that the application behaves as expected.
3. Separation of concerns: Spring MVC follows the Model-View-Controller (MVC) architectural pattern, which separates an application's concerns into three distinct components. This separation makes it easy to maintain and modify the application, as changes can be made to one component without affecting the others.
4. Good integration with other Spring modules: Spring MVC is part of the larger Spring framework and can be easily integrated with other Spring modules, such as Spring Security, Spring Data, and Spring Boot. This integration allows developers to take advantage of the full range of features provided by Spring.
5. Large community and resources: Spring MVC has a large and active community of developers, which means there are plenty of resources available online. This includes documentation, tutorials, and forums where developers can get help and share their knowledge.
6. Fast development time: Spring MVC provides several features that can speed up development time, such as automatic view resolution, data binding, and error handling. This can reduce the time required to develop and test an application, which can be particularly useful for projects with tight deadlines.
Building a Simple Spring MVC Web Application
Now that you have a basic understanding of Spring MVC and its components, let's build a simple web application using Spring MVC.
STEP 1: Creation of Maven Project
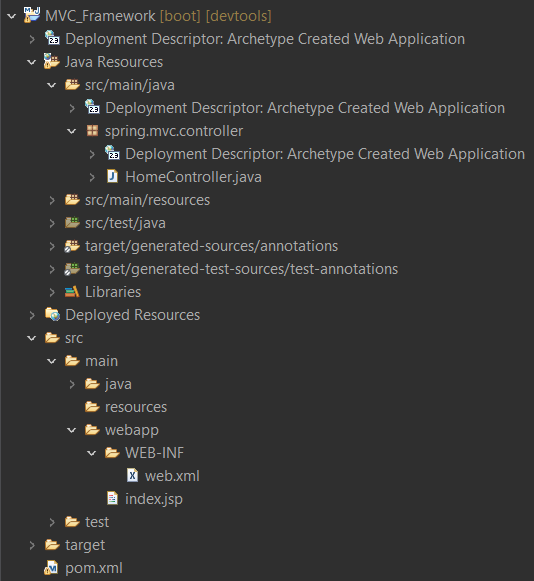
Create a Maven Project and add the Spring Dependencies into the pom.xml file. On your Eclipse IDE : Click on File -> New -> Other-> Maven Project -> Next-> Choose maven-archetype-webapp-> Specify GroupID -> Artifact ID -> Package name and then click on finish. The directory will look like below image. once project created add the required Spring framework dependencies in your pom.xml file.
STEP 2: Create a controller class
Create a controller class that handles requests from clients. The controller should be annotated with @Controller and include HTTP methods that handle different request URLs. The controller will map request URIs to view templates and perform necessary processing in between. These methods should return a view name or a ModelAndView object. I already created HomeController class in step 1 refer to that image.
In order to create a Controller class, I am using two annotations @Controller and @RequestMapping. Refer below image which shows controller code.
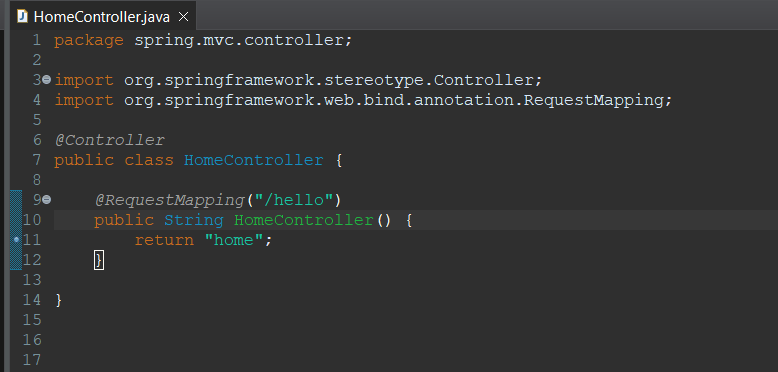
The @Controller annotation marks this class as Controller.
The @RequestMapping annotation is used to map the class with the specified URL name.
STEP 3: Create a view
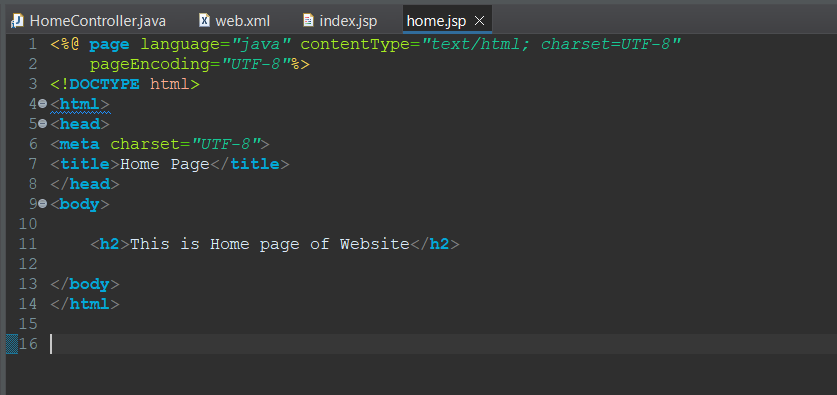
create a sub folder with name view under the webapp/WEB-INF. create a view file hello.jsp in this folder. refer the below image.
STEP 4: Configure Web.xml file
In this XML file, I am specifying the Servlet class which is DispatcherServlet that acts as the front Controller in Spring Web MVC. All the incoming requests for the HTML file will be forwarded to the DispatcherServlet. Let’s now write the web.xml file. This file will take the mappings and the URL pattern for executing the program.

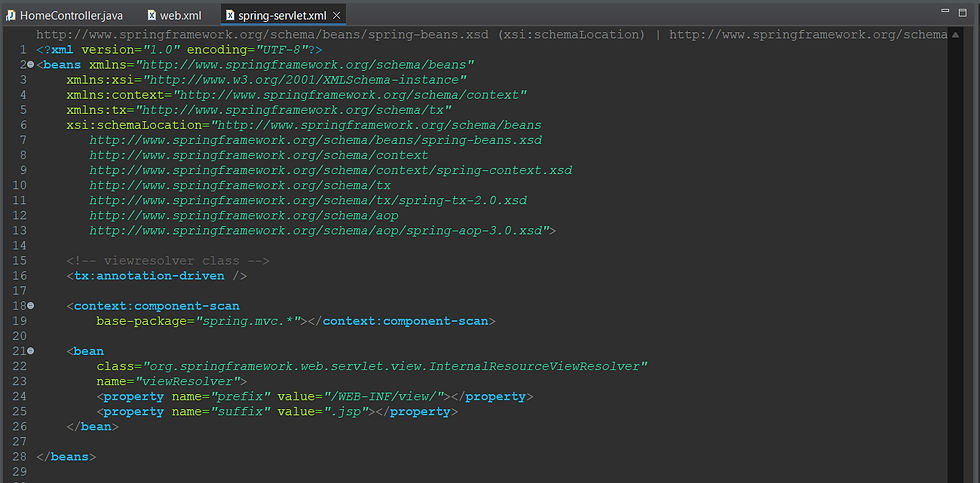
STEP 5: Create [servlet-name]-servlet.xml file
Framework will try to load the application context from a file named [serviet-name}-serviet.xml located in the application's WebContent/WEB-INFdirectory. The [servlet-name}-servlet.xml file will be used to create the defined beans, overriding the definitions of beans with the same name in the global scope. The <context:component-scan...> tag will be used to activate Spring MVC annotation scanning capability, which allows you to make use of annotations like @Controller and @RequestMapping.The InternalResourceViewResolver will have rules defined to resolve the view names.
STEP 6: Run the application
Start the web application server and run the application. You can access the application by entering the URL for the application in a web browser. You will see index page first then when you click on click here it will fire hello mapping from HomeController.


Conclusion
In conclusion, Spring MVC is a widely used framework for building web applications in Java. It provides a flexible and modular architecture that allows developers to build scalable and maintainable applications. Spring MVC's key features include a front controller pattern, dependency injection, and easy integration with other Spring modules. It also offers a range of view technologies such as JSP and Freemarker, as well as support for RESTful web services. Overall, Spring MVC simplifies the process of developing web applications in Java by providing a framework that promotes good coding practices and reduces the complexity of application development.
source code link : click here
Comments