
TestNG
- Kinjal Patel
- Aug 4, 2023
- 12 min read
What is TestNG?
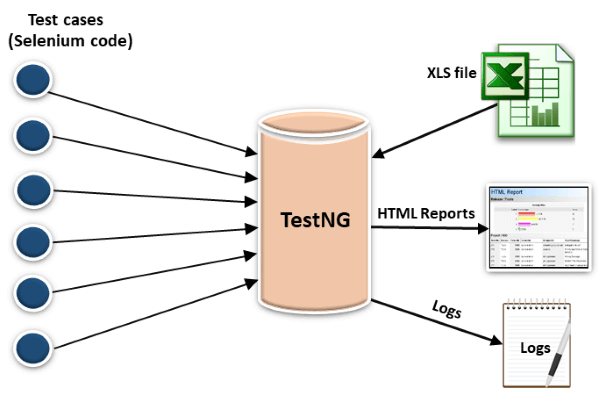
TestNG is an automation testing framework in which NG stands for "Next Generation". TestNG is inspired from JUnit which uses the annotations (@).
TestNG provides you full control over the test cases and the execution of the test cases.
Using TestNG you can generate a proper report, and you can easily come to know how many test cases are passed, failed, and skipped. You can execute failed test cases separately.
TestNG framework eliminates the limitations of the older framework by providing more powerful and flexible test cases with the help of easy annotations, grouping, sequencing, and parametrizing.
The TestNG provides an option, i.e., testng-failed.xml file in the test-output folder. If you want to run only failed test cases means you run this XML file. It will execute only failed test cases.
Why Use TestNG with Selenium
Generate the report in a proper format including the number of test cases runs, the number of test cases passed, the number of test cases failed, and the number of test cases skipped.
Multiple test cases can be grouped more easily by converting them into testng.xml file. In which you can make priorities on which test case should be executed first.
The same test case can be executed multiple times without loops just by using a keyword called 'invocation count.'
Using testng, you can execute multiple test cases on multiple browsers, i.e., cross-browser testing.
The testing framework can be easily integrated with tools like Maven, Jenkins, etc.
Annotations used in the testing are very easy to understand ex: @BeforeMethod, @AfterMethod, @BeforeTest, @AfterTest
Advantages of TestNG over Junit
In TestNG, annotations are easier to understand than Junit.
It produces the HTML reports for implementation.
It also generates the Logs.
InTestNG, there is no constraint available such as @beforeclass and @afterclass which is present in Junit.
TestNG enables you to group the test cases easily which is not possible in JUnit.
TestNG supports three additional levels such as @Before/Aftersuite, @Before/AfterTest, and Before/AfterGroup.
TestNG does not extend any class. TestNG framework allows you to define the test cases where each test case is independent of other test cases.
It allows you to run the test cases of a particular group. Let's consider a scenario where we have created two groups such as 'Smoke' and 'Regression'. If you want to execute the test cases in a 'Regression' group, then this can only be possible in the TestNG framework.
Parallel execution of test cases, i.e., running multiple test cases is only possible in the TestNG framework.
Features of TestNG
Multiple Before and After annotation options:- Before and after annotations are used to execute a certain set of code before and after executing the test methods. Some of the Before and After annotations are @BeforeSuite, @BeforeTest, @BeforeGroups, @BeforeClass, etc.
XML-based test configuration:- Test suites in a Testng are mainly configured by using the XML-based file. Testng.xml file is used to organize and run the test suites. The testng.xml file is used to create the test suites by using classes, test methods, and packages as well as by using the test groups. It is also used to pass the parameters to test classes or methods.
Dependent methods:- Dependency is a feature of Testng that allows a test method to depend on the single or group of test methods. Dependency works on the principle "depend-on-method" which must be either in the same class or in the inherited base class.
Groups/group of groups:- TestNG groups allow you to group the test methods. By using TestNG groups, you can declare the methods in a group as well as you can declare the groups within a group. The Testng group can be used to include a certain set of groups and can exclude another set of groups.
Dependent groups:- Similar to the Dependent methods, test methods in a group can depend on the test methods of another group.
Better reporting:- Testng provides XML and HTML reports by default for test execution. You can even add your own custom reports when required.
Open API:- TestNG contains the open API means API is publicly available to the developers. This feature allows you to create your custom extensions in your framework when required.
Parameterization of test methods:- This feature allows you to pass the arguments as parameters and this achieved by using testng@Parameters annotation. We can pass the parameters to test methods in two ways, i.e., testng.xml file and DataProviders.
Data-driven testing:- TestNG allows users to perform data-driven testing. This testing allows users to execute the same test multiple times with multiple sets of data. To achieve the data-driven testing, DataProvider feature is used. DataProvider is a data feeder method that executes the test method with multiple sets of data.
Multithreaded execution:- Multithreaded execution is the parallel execution of tests. Multithreading means the execution of multiple parts of software at the same time.
TestNG Installation
Open the Eclipse. Click on the Help appearing on the menu bar and then click on the Install New Software.
Copy the URL https://beust.com/eclipse. Once you paste the URL, then press the Enter
Click on the TestNG checkbox.
Three dependencies of TestNG are shown. Now click on the Next.
Accept the license and then click on the Finish.
Download the TestNG jar file
Importance of XML file in TestNG Configuration
In TestNG, you can define multiple test cases in a single class whereas, in Java, you can define only one test in a single class in the main() method. In Java, if you want to create one more test, then you need to create another java file and define the test in the main() method.
Instead of creating test cases in different classes, we recommend you to use TestNG framework that allows you to create multiple test cases in a single class.
You can create multiple test cases with the help of @Test annotation.
Create a xml file:- Right click on the project. Move your cursor down, and you will see TestNG and then click on the Convert to TestNG.
Exclude/Include test cases
TestNG provides the feature of enabling and disabling the test cases. We can disable a set of test cases from getting executed.
For example, consider a scenario where a serious bug occurs in a feature due to certain tests, so we need to disable the test cases from being executed.
In TestNG, test cases can be disabled in two ways:
You can disable the test case in a @Test annotation. You can disable the test case in the XML file.
Example @Test(enabled=false)
public void test1() // First test case { System.out.println("Hello TestNG!!"); }
XML Example <suite name="loan_department"> <test name="Personal_loan"> <classes> <class name="day1.module1"/> </classes> </test> <!-- Test --> <test name="Car_loan"> <classes> <class name="day1.module2"> <methods> <exclude name = "MobileLoginCarLoan"/> </methods> </class> </classes> </test> </suite>
Running test cases with Regex
we will use the regular expressions to include/exclude test methods from the test suite execution. <classes> <class name="com.testNG.test"> <methods> <include name="Mobile.*"/> </methods> </class> </classes>
TestNG Groups
TestNG Groups allow you to perform groupings of different test methods. Grouping of test methods is required when you want to access the test methods of different classes.
Not only you can declare the methods within a specified group, you can also declare another group within a specified group. Thus, TestNG can be asked to include a certain set of groups while excluding another set of groups.
It provides you maximum flexibility by partitioning your test methods in groups and does not require recompilation of test cases if you run your two different sets of test cases back to back.
Groups are specified in the testng.xml file with <groups> tag. Groups can be specified either in the <suite> tag or <test> tag. If the <groups> tag is specified inside the <suite> tag, then it is applied to all the <test> tags of XML file. If the <groups> tag is specified within a particular <test> folder, then it is applied to that particular <test> tag only.
Example 1
public class Personal_loan { @Test(groups= {"SmokeTest"}) public void WebLoginPersonalLoan() { System.out.println("Web Login Personal Loan"); } public class Home_loan { @Test(groups= {"SmokeTest"}) public void MobileLoginHomeLoan() { System.out.println("Mobile Login Home Loan"); } public class Car_loan { @Test(groups= {"SmokeTest"}) public void APILoginCarLoan() { System.out.println("API Login Home Loan"); }
XML Example
<suite name="test_suite"> <test name="Loan"> <groups> <run> <include name="SmokeTest"/> </run> </groups> <classes> <class name="com.Test.Personal_loan"/> <class name="com.Test.Home_loan"/> <class name="com.Test.Car_loan"/> </classes> </test> <!-- Test --> </suite>
Example 2
public class Groups { @Test(groups= {"Group A"}) public void testcase1() Multigroup { System.out.println("Test case belonging to Group A"); } @Test(groups= {"Group A","Group B"}) public void testcase2() { System.out.println("Test case belonging to both Group A and Group B"); } @Test(groups= {"Group B"}) public void testcase3() { System.out.println("Test case belonging to Group B"); } }
XML Example
<suite name="test_suite">
<test name="Group A">
<groups>
<run>
<include name="Group A"/>
</run>
</groups>
<classes>
<class name="com.Test.Groups"/>
</classes>
</test> <!-- Test -->
<test name="Group B">
<groups>
<run>
<include name="Group B"/>
</run>
</groups>
<classes>
<class name="com.Test.Groups"/>
</classes>
</test> <!-- Test -->
</suite> <!-- Suite -->
Including/Excluding Groups <suite name="test_suite"> <test name="Include and Exclude Group"> <groups> <run> <include name="Include Group"/> <exclude name="Exclude Group"/> </run> </groups> <classes> <class name="com.testNG.Groups"/> </classes> </test> <!-- Test --> </suite>
Using Regular Expressions public class Regular_Expression { @Test(groups= {"Include test case1"})
public void test_case1(){ System.out.println("This is test case 1"); } @Test(groups= {"Include test case2"})
public void test_case2(){ System.out.println("This is test case 2"); } @Test(groups= {"Exclude test case3"})
public void test_case3(){ System.out.println("This is test case 3"); }
What is TestNG Annotation?
TestNG Annotation is a piece of code which is inserted inside a program or business logic used to control the flow of execution of test methods.
1. @BeforeSuite
The @BeforeSuite annotated method is executed before the execution of all the test cases defined in the folder.
@BeforeSuite annotated method so that before executing all the test cases, you need to load all the environment variables for your framework, and then it starts executing your test cases.
2. @AfterSuite
The @AfterSuite annotated method is executed after the execution of all the test methods in the Suite. The Suite is basically a testng.xml file so we can say that @AfterSuite annotated method is executed after the execution of an XML file.
@AfterSuite annotation is used to stop the selenium web drivers.
3. @BeforeTest
The method which comes under the @BeforeTest annotation will be executed first before any test belonging to that folder.
You have a requirement when you automate the test cases, you want your data to be deleted first which you submitted. For example, when you run the test case, you will fill the details in a form, and the data is saved in a database. When you run the test case again, then you get an error that "data already exists".
4. @AfterTest
The test method under the @AfterTest annotated method is executed after the execution of all the test methods of the available classes which are kept inside the tag in the testng.xml file in the suite.
5. @BeforeClass
The @BeforeClass annotated method runs before the execution of test methods in a current class.
6. @AfterClass
The @AfterClass annotated method will be executed after all the test methods of a current class have been invoked.
7. @BeforeMethod
Is specific to a class not to an XML file. The @BeforeMethod annotated method will be invoked before the execution of each test method where the test method is nothing but a test case. Suppose there are four test methods in a class then the @BeforeMethod annotated method is executed before the execution of each test method. If there are four test methods, then four times @BeforeMethod annotated method will be invoked.
8. @AfterMethod
Annotation is specific to a class not to an XML file. The @AfterMethod annotated method will be invoked after the execution of each test method
9. @BeforeGroups
The @BeforeGroups annotated method will run only once before all the test methods belonging to a specified group have been executed.
10. @AfterGroups
The @AfterGroups annotated method will run only once after the execution of all the test methods of a specified group.
TestNG Annotation Attributes
We can explicitly specify the attributes in a @Test annotation @Test(attribute="value")
Description:- It is a string which is attached to the @Test annotation that describes the information about the test. @Test(description="This is testcase1")
dependsOnMethods:- When the second test method wants to be dependent on the first test method, then this could be possible by the use of "dependOnMethods" attribute. If the first test method fails, then the dependent method on the first test method, i.e., the second test method will not run. @Test(dependsOnMethods= {"WebStudentLogin"}) @Test(dependsOnMethods= {"testcase3","testcase2"})
timeOut:- If one of the test cases is taking a long time due to which other test cases are failing. To overcome such situation, you need to mark the test case as fail to avoid the failure of other test cases. The timeOut is a time period provided to the test case to completely execute its test case. @Test(timeOut=200)
Priority:- When no 'priority' attribute is specified then the TestNG will run the test cases in alphabetical order. Priority determines the sequence of the execution of the test cases. The priority can hold the integer values between -5000 and 5000. When the priority is set, the lowest priority test case will run first and the highest priority test case will be executed last. Suppose we have three test cases and their priority values are -5000, 0, 15, then the order of the execution will be 0,15,5000. If priority is not specified, then the default priority will be 0. @Test(priority=1)
Enabled:- The 'enabled' attribute contains the boolean value. By default, its value is true. If you want to skip some test method, then you need to explicitly specify 'false' value. @Test(enabled=false)
Groups:- The 'groups' attribute is used to group the different test cases that belong to the same functionality. @Test(groups= {"software company"})
TestNG Annotation Parameters
TestNG Parameters are the arguments that we pass to the test methods. There are two ways through which we can pass the parameters to the test methods: 1. TestNG Parameters 2. TestNG Parameters using Dataprovider
1. TestNG Parameters
Parameterization in the xml file:- Suppose we want to set the global variables such url settings, username, password or API Keys, there are some values which are constant in all the test cases, in such case we use the TestNG Parameters. @Parameters({"a","b"})
Global parameter <parameter name="a" value="5"/> <parameter name="b" value="3"/> <test name="Sum"> <classes> <class name= "com.testing.Sum"/> </classes> </test> <!-- Test --> <test name="Subtract"> <classes> <class name="com.testing.Subtract"/> </classes> </test> <test name="Multiply"> <classes> <class name="com.testing.Multiply"/> </classes> </test>
Local Parameter <suite name="Suite"> <test name="Fruits"> <parameter name="mango" value="mango"/> <parameter name="orange" value="orange"/> <classes> <class name= "com.test.Fruits"/> </classes> </test> <test name="Vegetables"> <parameter name="Cauliflower" value="Cauliflower"/> <parameter name="Ladyfinger" value="Ladyfinger"/> <classes> <class name= "com.test.Vegetable"/> </classes> </test> </suite>
2. TestNG Parameters using Dataprovider
@Parameters annotation is easy but to test with multiple sets of data we need to use Data Provider.
To fill thousand's of web forms using our testing framework we need a different methodology which can give us a very large dataset in a single execution flow.
This data driven concept is achieved by @DataProvider annotation in TestNG.
It has only one attribute 'name'. If you do not specify the name attribute then the DataProvider's name will be same as the corresponding method name.
Data provider returns a two-dimensional JAVA object to the test method and the test method, will invoke M times in a M*N type of object array. For example, if the DataProvider returns an array of 2*3 objects, the corresponding testcase will be invoked 2 times with 3 parameters each time.
TestNG @Factory annotation
Sometimes we may need to run a set of tests with different data values. To achieve this we may define a separate set of tests inside a suite in the testng XML and test the required scenario. The problem with this approach is that if you get an extra set of data, you will need to redefine the test.
TestNG solves this problem by providing the @Factory annotation feature. Factory in TestNG defines and creates tests dynamically at runtime.
It’s mandatory that a factory method should return an array of Object class i.e. Object [].
A factory method is defined by declaring @Factory above the respective test method.
Main advantage of using the factory methods is that you can pass parameters to test classes while initializing them.
Example public class SimpleTest { private int param; public SimpleTest(int param) { this.param = param; }
@Test public void testMethodOne() {
int opValue = param + 1;
System.out.println("Test method one output: " + opValue); }
@Test public void testMethodTwo() { int opValue = param + 2; System.out.println("Test method two output: " + opValue); }}
public class SimpleTestFactory { @Factory public Object[] factoryMethod() { return new Object[] { new SimpleTest(0), new SimpleTest(1) }; }}
TestNG Listeners
TestNG provides the @Listeners annotation which listens to every event that occurs in a selenium code. Listeners are activated either before the test or after the test case. It is an interface that modifies the TestNG behavior. For example, when you are running a test case either through selenium or appium and suddenly a test case fails. We need a screenshot of the test case that has been failed, to achieve such scenario, TestNG provides a mechanism, i.e., Listeners. When the test case failure occurs, then it is redirected to the new block written for the screenshot. Listeners are implemented by the ITestListener interface.
InvocationCount in TestNG
Invocation count is used when you want to run the same tests multiple times. Below example illustrates how to use invocation count in TestNG. In below example, test1 will be executed 5 times. We have also used threadPoolSize parameter with value as 2. It means that 2 threads will be created to run the test in parallel.
Example
import org.testng.annotations.Test; Import java.util.concurrent.atomic.AtomicInteger; public class InvocationTest { AtomicInteger sequence = new AtomicInteger(0);
@Test(invocationCount = 5, threadPoolSize = 2)
public void test1(){ int count= sequence.addAndGet(1);
System.out.println("Test Run Number "+count + " run by Thread " +Thread.currentThread().getId()); }}
ITestListener interface
onTestStart(): An onTestStart() is invoked only when any test method gets started.
onTestSuccess(): An onTestSuccess() method is executed on the success of a test method.
onTestFailure(): An onTestFailure() method is invoked when test method fails.
onTestSkipped(): An onTestSkipped() run only when any test method has been skipped.
onTestFailedButWithinSuccessPercentage(): This method is invoked each time when the test method fails but within success percentage.
onStart(): An onStart() method is executed on the start of any test method.
onFinish(): An onFinish() is invoked when any test case finishes its execution.
Example
public class Listener implements ITestListener { @Override public void onTestStart(ITestResult result) { } @Override public void onTestSuccess(ITestResult result) { System.out.println("Success of test cases and its details are : "+result.getName());} @Override public void onTestFailure(ITestResult result) { System.out.println("Failure of test cases and its details are : "+result.getName()); } @Override public void onTestSkipped(ITestResult result) { System.out.println("Skip of test cases and its details are : "+result.getName()); }
@Override public void onTestFailedButWithinSuccessPercentage(ITestResult result) { System.out.println("Failure of test cases and its details are : "+result.getName()); } @Override public void onStart(ITestContext context) { } @Override public void onFinish(ITestContext context) { }
@Listeners(com.newpackage.Listener.class)
public class Class1 { @Test public void sum() { int sum=0; int a=5; int b=7; sum=a+b; System.out.println(sum); } @Test public void testtofail() { System.out.println("Test case has been failed");
Assert.assertTrue(false); }
Create the listeners by using testng.xml file.
Use of Listener for multiple classes. <suite name="Suite"> <listeners> <listener class-name="com.newPackage.Listener"/> </listeners> <test name="Listeners_program"> <classes> <class name="com.newPackage.Testcases"></class> </classes> </test> </suite> <!-- Suite -->
Customized Report
Add maven dependencies <!-- pom.xml --> <dependency> <groupId>com.aventstack</groupId> <artifactId>extentreports</artifactId> <version>3.1.5</version> </dependency>
// initialize the HtmlReporter ExtentHtmlReporter htmlReporter = new ExtentHtmlReporter("extent.html");
//initialize the realtime logger (pro-only)
ExtentLogger logger = new ExtentLogger();
// initialize ExtentReports and attach the HtmlReporter ExtentReports extent = new ExtentReports();
// attach only HtmlReporter extent.attachReporter(htmlReporter);
// creating tests ExtentTest test = extent.createTest("MyFirstTest");
test.pass("details");
Comments